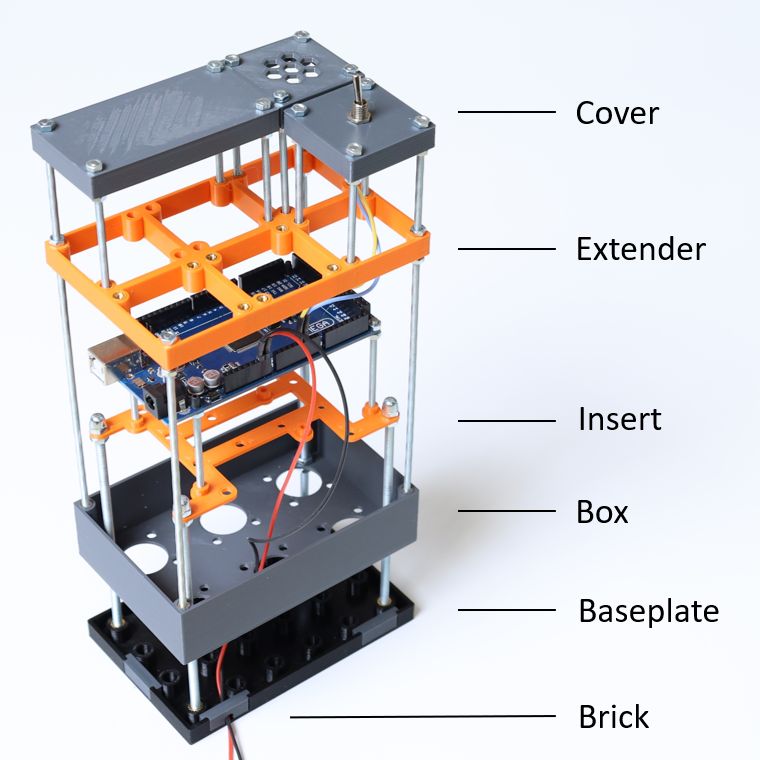
The Evenblox system is a flexible way to make housing for your electronics projects, and it’s easy to start. It’s important to understand the different parts. The following image shows an exploded view of the Evenblox system.

Follow the next steps to complete an entire project :
- What do I need?
- Print the Inserts
- Print the Covers
- Play around with the layout
- Print Extenders
- Print the Boxes
- Print Baseplates
- Put it all together
What do I need?
When you need housing for your electronics project, you probably know what you need. You might have a breadboard with your project on it or an Arduino board with other parts dangling around it. How do I deal with all these components when putting them in the housing? Do I make a shield for the Arduino, or do I use a protoboard and put it next to the Arduino?
Think about other things you might need. Do I need an on/off switch, a voltage regulator, a battery, or other components? When you know what you need, you can start printing.
Print the Inserts
Print the Inserts for all components (Arduino, Teensy, Raspberry Pi, etc.)
Print the Covers
Print the covers using buttons, displays, and other non-standard covers
Play around with the layout
You must determine two layers of your project: the box layer and the Cover layer. If you have buttons, switches, displays, and other user controls, start with the cover layer. This layer determines where the Boxes have to sit. When doing two-layer projects with 2020 Extrusion(front and back), it is easier to configure the buttons and displays in a user-friendly way.
Remember that the inserts are designed to be as small as possible when determining the box layer. If you need the USB connection of an Arduino, you need space for the connector. You must remember this to determine the size and position of the Insert in the box.
Arrange the boxes with the length of the wiring in mind. Start with the more prominent size components, for example, an Arduino, Raspberry Pi, and power supply. In the end, you want a rectangle-shaped layout. If the layout has blank spaces, you can print extra boxes and covers to fill these for future changes.
Print Extenders
Extenders are a nice way to add more covers to a single box. This is not always necessary, but when there are a lot of user controls, it’s the best way to mount these. An extender is 10 mm high, so you must consider this.
Print the boxes
When you have the layout and you know how big the boxes should be, you can print these.
Print baseplates
You don’t need the Baseplates if you use the 2020 extrusion to mount your boxes. When you don’t use the 2020 extrusion, you have to print the Baseplates. There are several sizes; if your project is bigger than one baseplate, you can use multiple Baseplates. Basesplates can be connected with Baseplate connectors. Determine the size of the Baseplate in such a way that the seam of the Baseplates is under the boxes. The boxes should be screwed on both Baseplates to give it its strength.
Also, print the Baseplate Inserts to pass wires through or close the unused holes off the Baseplates.
Putting it all together
When you have all components ready you can put it all together. The best order is the following:
- Mount the components (Arduino, etc.) on the Inserts
- Mount the components (Switches, displays, etc.) on the Covers
- Melt heat-set inserts into the Extender if needed
- Mount the Covers onto the Extender if needed
- Melt heat-set inserts into the Boxes
- Put the Inserts in the Boxes without bolts
- Wire all components (Leave some slack and pass the wire through the holes in the Boxes)
- Put the Baseplate inserts into the Baseplate holes
- Melt heat-set inserts into the Baseplate
- Mount the Boxes onto the Baseplate
- Mount the Covers onto the Boxes
